Monday, December 21, 2009

Ornament Inspiration

This ornament is as cute as they come. I found it on the Dancing Gnome etsy shop and I couldn't help but imagine the whimsical woodland wedding that could come out of it. I think the ornaments would make great cake toppers and then a few gnomes could be sprinkled throughout for some fun decorations. Gnome illustrations could be used as table numbers, and those little red hats are the perfect pop of color.
cakebar, invites, illustration, old gnome, bride and groom, lovenest and the random forest/tree pics were taken by me while we were snowshoeing in Sequoia National Park this weekend. So pretty.

And since it's the holiday season and I love wrapping gifts, I thought I'd share a tip on what to do with excess doilies with the hive. Solid paper from Target, various sizes of doilies and raffia from Michael's and cardstock from Paper Source equals too cute gift wrap. You can also see a handy brown paper bag in there.


All of these were wrapped with one roll of paper, 2 packs of doilies and one roll of raffia.

For cylinders (like wine bottles and candles) just make a ribbon of paper and wrap around the perfectly cylindrical part. Cut a long strip of paper and fold over the sides to get neat edges and wrap around. Slap on a doily and some raffia and you're good to go.

Friday, December 18, 2009

Ring Bearer Pillow and Mr. MB's Ring

You might remember my ring, from this post, but here's Mr. MB's ring (with mine) on a handkerchief gifted to us at the rehearsal dinner with our names and wedding date embroidered for posterity.
We also found this jeweler on etsy, but then just ordered it over email since it was a special (cheaper) order. We switched out the metal to 10K white gold to get this ring within our reach. Jim Dailing (the jeweler) couldn't have been better to work with, he was lightning fast and didn't make us feel lame about downgrading his beautiful design.

And for fun, here's the ring bearer pillow that Momma MB whipped up in the last days before the wedding. It incorporates the silk and lace used in my dress and a button from my Grandma's dress is in the center.

The back has a handy dandy handle for our ringbearer. We used our old cohabitation rings as stand-ins on the big day (mostly because I forgot to buy some decorative ones).


And for those curious readers out there, here's a quick quilting 101 lesson. Sorry for lack of pictures, this thing got made in the wee hours. But the diagram above can be printed out to whatever size you want for super simple pattern pieces. The grey is where the lace went and it's important to pay attention to the grain of the silk when you're putting this together. It's just for aesthetics, but just make sure you're putting the nubby dupioni silk 'stripes' in the direction you desire.

  • Cut your pieces with the 1/4" seam allowance all the way around (4 squares and 4 triangles out of silk, 2 triangles out of lace).
  • Pin your lace triangles on top of the silk ones and baste together very close to the edges. Sew your lacey triangles to their non-lacey counterparts (along the diagonal) and open into a square. Use a low setting on your iron to press the seams.
  • Sew each of your triangles to their squares, open and iron seams. Sew the two halves to eachother, open and iron seams.
  • Momma MB added a decorative zigzag stitch along the center seams. If you want to do this, just play with your sewing machine settings until you find a decorative stitch (and size) that you like and topstitch over the seams.
  • After that take your large square for the back of the pillow and pin to quilted top, right sides together. Sew together almost all the way around (leave an inch or so open to turn out and stuff).
  • Turn the pillow right side out and be sure to push out corners (the blunt end of a chopstick or something similar would be good).
  • Stuff with poly-fil or whatever you'd like in there (some of you might want to add a lavender sachet).
  • Close up the 1 inch opening by hand stitching (keep your stitches small and unobtrusive).
  • Grab a button and a long needle. Place needle in the center, push through and pull tight to tuft your pillow. Sew on the button.
  • Momma MB handstitched on the handle and ring ties at this point (but it might make more sense to sew those on before you put the two sides of the pillow together).
There you go, pillow done!

Thursday, December 10, 2009

Gifts For Those That Wore What We Told Them To

Mr. Moonbeam got his guys flasks with their initials monogrammed on them. It's standard, I know, but the guys loved them and used them immediately. We picked up ours at Things Remembered.
Source

Mr. Moonbeam's brother (his best man) got the deluxe kit below. It came in a nice box and we had his first name put on the plaque.
Source

My ladies got some cute little items from Ulta along with some bronze necklaces from Macy's. Ulta was having a sale and you could pick up stocking stuffers at the great price of 5 for $5. They got lotion, a mini make-up brush kit, nail polish, lip gloss and a nail file.
Look at these awesome necklaces, I really should have bought some for myself.
I might have to use some of those leftover gift cards on this.

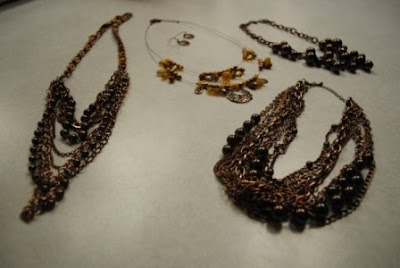
The flower girls got these adorable little purses, they match nothing and I didn't care. I picked them up at Claire's for 8 bucks each. They were filled with some Ulta loot as well: sparkly silver nail polish, a mirror, some lip gloss and very pale eyeshadow (don't want those little kiddies looking too made up.) The older girls also got an awesome candy necklace kit and the littlest flower girl got some Dora the Explorer candy. The candy necklace kit was such a big hit, my bridesmaids were a tad jealous.
And the ringbearer got a travel Scrabble set. I simply had no idea what sort of wedding-related gift to get for a boy, so I just got him something he'd like.
Pic by Aunt Annie

Since he made his Grandpa dig right in, I think it was a good choice.

In the end, they were pretty standard gifts, but at that final push, you're too tired to reinvent the wheel and everyone seemed pretty pleased.

Anyone else have trouble gifting boys/men? I never have a clue.

Wednesday, December 2, 2009

Craft Night!

In the week before the wedding we had some ladies over to help finish up some crafts. Sister MB, Momma MB, Grandma MB, Aunt Eileen, flower girl Abby and Aunt Annie were there to help and so was Mom's friend Linda. Thanks for all of your help ladies!

I felt it was only fair to give my workers provisions. I made panzanella and minestrone, both were a big hit.

Quick recipe, because it's so easy and yummy.

Panzanella (Bread Salad)

1 loaf of bread
Tomatoes
Cucumbers
Bell Peppers
Garlic
Lemon
Dijon Mustard
Olive Oil

Cube and toast the bread.
Dice all your veggies.

Smash some garlic cloves into a bowl or vinaigrette bottle, squeeze in some lemon juice, olive oil, dijon mustard, salt and pepper to taste. Mix it all up and strain over your veggies. Toss with bread at the last minute.

Top with some grated parmesan (the real stuff, not the can, trust me).

It's my kind of salad (more croƻtons than veggies).

Aunt Annie and flower girl Abby stuffing recipe cards into favor bags.

To make the vases for the reception we gathered a bunch of mason jars. We used the quilted jars. They seemed a bit more appropriate for our family that has made 100's of quilts. Get a bunch of cotton fabric, some ribbon lace, buttons, fabric flowers and hot glue. We ripped the fabric into appropriately sized strips and removed all excess threads. To rip fabric just notch the fabric and rip apart. Important note: you can only properly rip along the lenghtwise grain of the fabric. Lengthwise means parallel to the selvedge. Selvedge is that finished edge that runs along the length of a bolt of fabric. If it's puckering as you rip it and not ripping straight, you're ripping the wrong way.

Then it's really just a matter of hot glue. Wrap your fabric around and glue in place. Wrap ribbon around and glue in place. Attach fabric flower with hot glue and then add the button with, you guessed it, hot glue.

We had two sizes of these cute little vases. Larger for the tables and smaller for filler on random tables. We also had little tiny jars with little tiny plants in them.
Here's the only shot I've got so far of a vase in action. This was either taken by my Aunt Annie (the family shutterbug) or London 'maid. Either way thanks to both of them for taking pictures, especially Aunt Annie, she got a ton of things that we forgot about. And, of course, there were things that didn't make it onto that table. We could not find the tea lights and I wanted squares of the same fabric we used on the vases in the center of the table, but at some point you just let go of things. I try to remind myself that I'm the only one that notices.